Drum Bus Compression: How to Glue Drums Without Losing Punch
I use bus and parallel compression to bring sampled drums together while keeping the initial hit. Here I explain my approach with Gluon, comparing the original loop, bus compression, and a parallel blend, with audio examples and the settings behind them.
You build a drum pattern from samples. You like the kick, the snare works, and the hi-hats are in place. Each sound is good on its own, but together they feel slightly disconnected—as if each came from a different track.
Getting them to work together starts with sample selection and balance. Shared reverb or saturation can help, too. Compression on the drum bus adds something particularly useful: it gives the instruments a shared pattern of level changes. That is a big part of what people mean by “glue compression.”
I use this idea in Gluon, my free bus compressor. Here, I’ll explain what compression can bring together, how to keep the drums punchy, and why a heavily compressed parallel layer can sometimes be exactly what the part needs.
What brings the drums together?
Imagine a kick, snare, and hi-hats routed to the same bus. The compressor responds to their combined signal. When a loud hit triggers gain reduction, the level of the whole bus changes: sounds playing alongside the kick are turned down with it. The gain then recovers.
That creates a relationship between the instruments. They keep their own attacks and timbres, but share an additional layer of movement: compression, sustained gain reduction, and recovery. Sometimes it is barely noticeable; sometimes it becomes an obvious part of the groove.
If the processing adds saturation, the bus also takes on a shared character. That does not mean every instrument receives an identical dose of harmonics. Nonlinear processing responds to the level and to the combination of sounds at that moment.
What matters to me is the sense of a coherent performance. If the kick, snare, and percussion start to feel like one part, the processing is doing its job. The word “Glue” on a plugin cannot guarantee that result.
How to set up drum bus compression
For your first pass, leave the output clipper and additional coloration off. This makes it easier to hear what the compression itself is doing.
Try a ratio of 2:1 or 4:1, an attack of 10–30 ms, and a release around 0.1–0.2 seconds. These are starting points, not a recipe for every loop. Lower the threshold until the stronger hits produce a few decibels of gain reduction, then listen to the whole pattern.
Pay attention to the beginning of the kick and snare. A slower attack can leave more of the initial hit while compressing the body more heavily. A faster attack has more influence on the onset. But attack is not a countdown during which the compressor does nothing: the way gain reduction develops depends on the algorithm.
Next, listen to the gaps between hits. A long release can leave the bus compressed when the next event arrives. A shorter release lets it recover sooner. This is often where you find the movement you want—or an unwanted dip in the groove. The exact response depends on the compressor’s design; the different approaches are examined in this technical analysis of digital compression.
Finally, compare the processed signal with the original at a similar perceived loudness. Gluon’s MakeUp Learn listens to a passage and sets a fixed compensation value. Check the result by ear as well. The louder version can easily seem more convincing.
Why I wanted faster settings and a 20:1 ratio
When I made Gluon, I wanted to go beyond the usual control ranges of glue compressors. Parallel compression was one practical reason.
For the parallel layer, I can use a fast attack, a short release, and a high ratio—up to 20:1. I compress that layer heavily, compensate its level, and gradually blend it with the original drums.
This brings up quieter details: tails, softer hits, background texture, and the spaces between the main events. The dry path retains the original onset of each hit. It gives me a way to add density without putting the entire sound through one aggressive compressor setting.
It helps to listen to the compressed layer on its own first. Then take it out of the blend and gradually bring it back with Mix. The point where the drums feel fuller but still hit hard is often more useful than the maximum amount of processing.
The result still has different dynamics. Retaining the dry attack and leaving the entire dynamic range unchanged are different things. Too much of the compressed layer reduces the contrast between loud and quiet events again.
In the audio example below, I compare the original drum loop, moderate bus compression, and a blend with a heavily compressed parallel layer. Switch between them and listen to the kick and snare attacks, the movement between hits, and the quieter details.
Show settings
| Version | Threshold | Ratio | Attack | Release | MakeUp | Mix |
|---|---|---|---|---|---|---|
| Original | compressor off | |||||
| Bus compression | −18 dB | 4:1 | 3 ms | 0.2 s | 4.5 dB | 100% |
| Parallel blend | −36 dB | 20:1 | 0.01 ms | 0.05 s | 22.7 dB | 50% |
The three files are matched to the same loudness for the comparison, so you compare density and attack, not level.
Vintage and the output clipper/limiter are off in this comparison, so the focus is compression and the parallel blend.
What Vintage adds
Vintage grew out of my research into nonlinear processing in tube compressors. I wanted to bring some of that behavior into Gluon’s own model.
In Gluon 1.2, Vintage connects coloration to compression: deeper gain reduction produces stronger harmonic coloration. It also changes the knee, making the transition into compression broad and gradual. Switching between Modern and Vintage therefore changes both the tone and the compression behavior.
One use I enjoy is dirty, saturated hip-hop drums. I can process a parallel layer quite heavily, add harmonics, and blend it with the clean signal. Or I can keep the processing fully in the main path and be more restrained with Bias.
Bias controls the amount of coloration. Lower settings are more subtle; turning it further adds more obvious saturation. When switching Vintage on and off, watch the gain-reduction meter too. If the compression behavior has changed, you may need to adjust Threshold and loudness for the comparison you want to make.
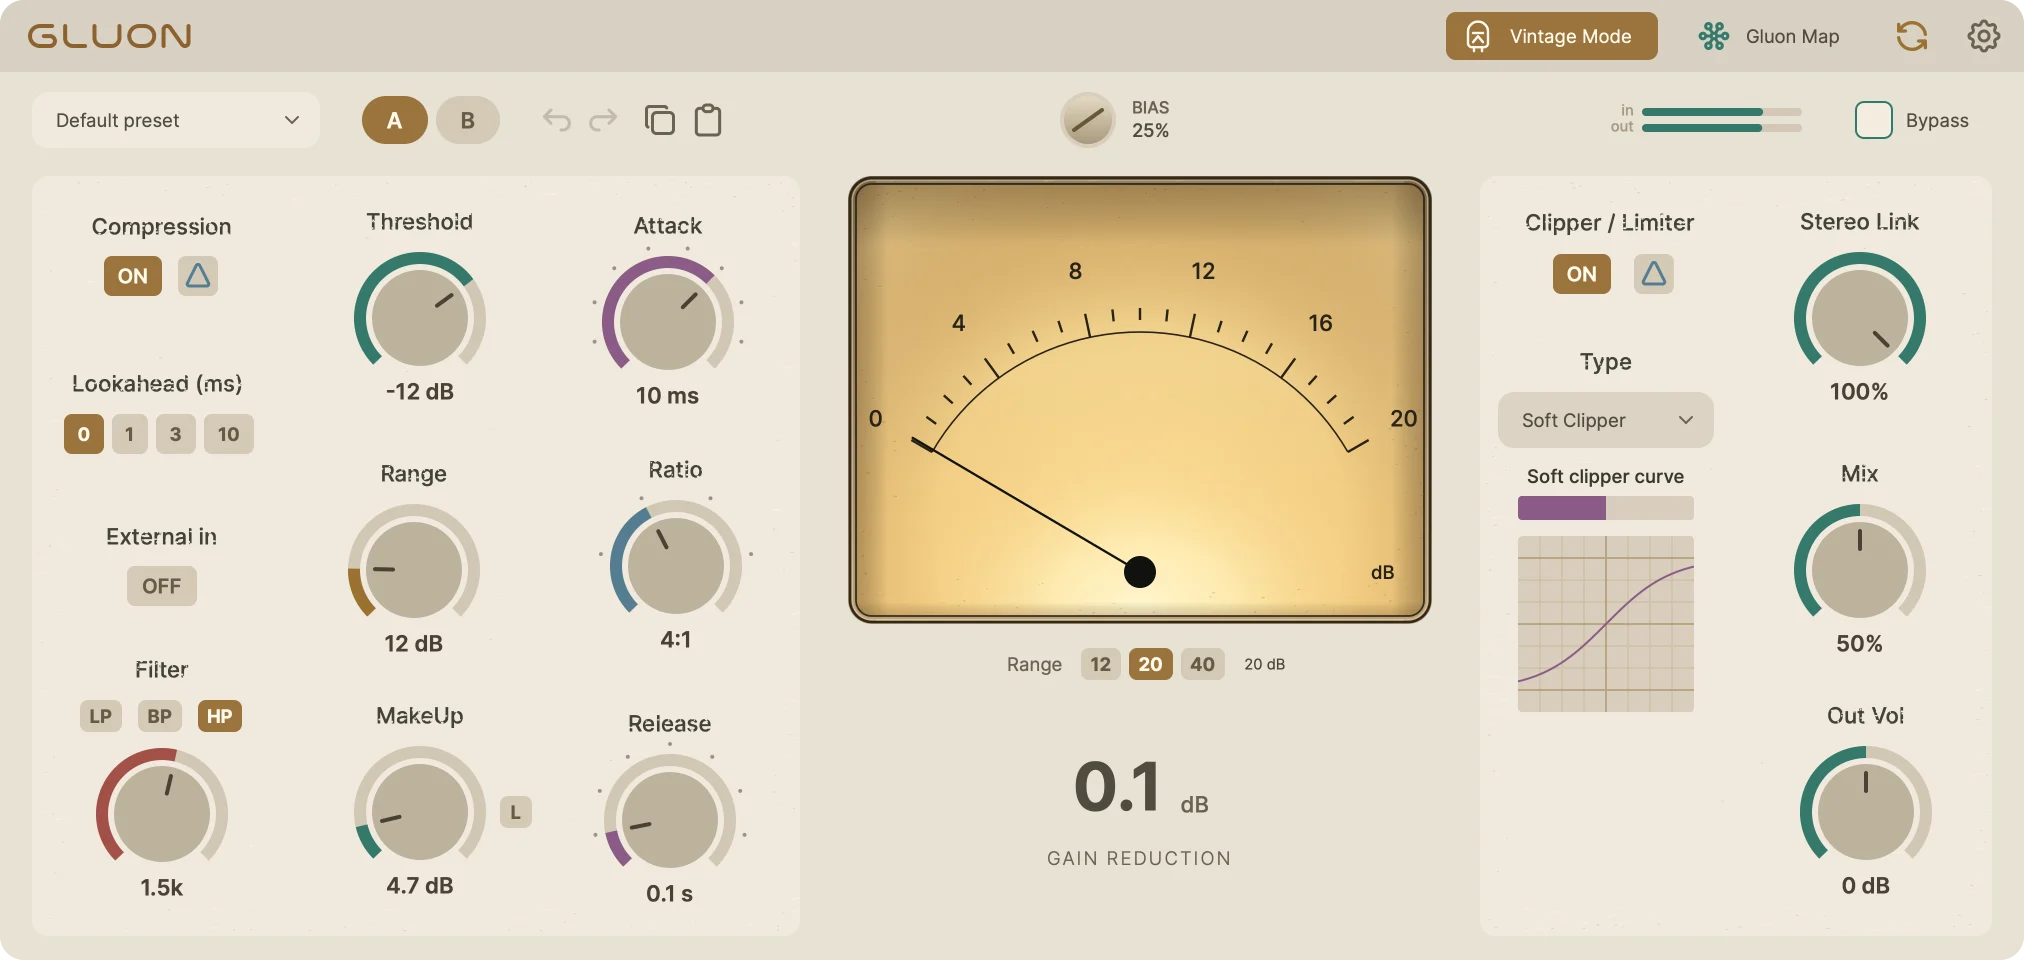
This is Gluon’s own model, inspired by tube compressors. It is not presented as an exact recreation of a particular piece of hardware.
The next example compares Modern with two amounts of Vintage coloration on the same drum loop. Listen for changes in texture, density, and the definition of the hits as Bias increases.
Show settings: Vintage, driven Bias
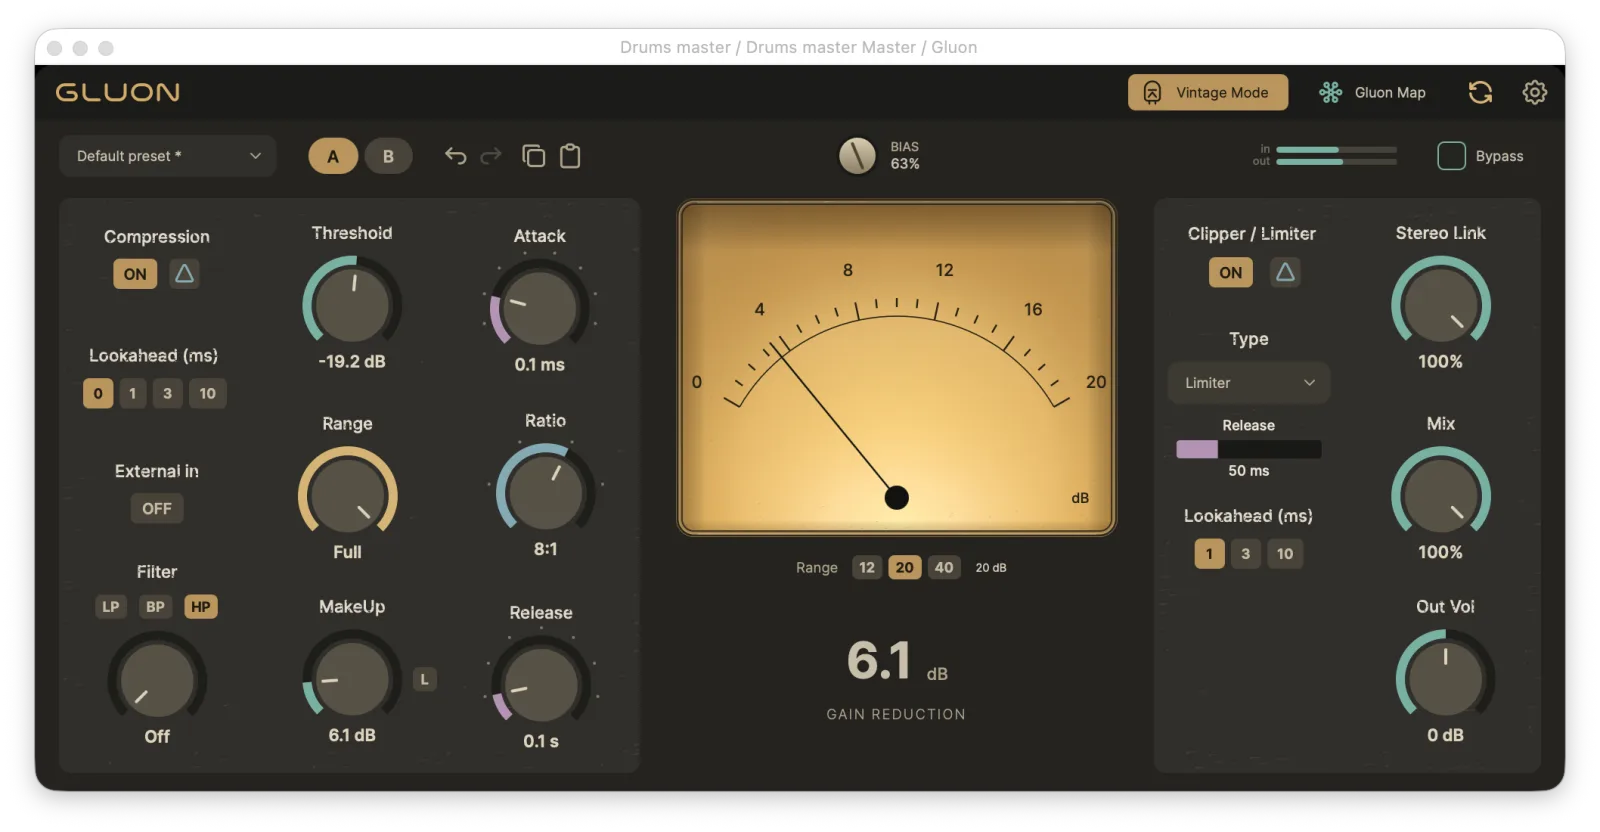
- Threshold: −19.2 dB, Ratio: 8:1, Range: Full
- Attack: 0.1 ms, Release: 0.1 s, Lookahead: 0
- MakeUp: 6.1 dB, Mix: 100%, Stereo Link: 100%
- Vintage Mode: on, Bias: 63%
Modern and the subtle Vintage version use the same compressor settings; the subtle version has Bias at 25%. The peaks of all three stay below the output limiter’s ceiling, so the output section does not shape this comparison. The three files are matched to the same loudness.
The compressor controls stay fixed. Switching to Vintage changes both coloration and compression behavior, so this is a comparison of the complete modes.
Gluon Map: individual drums and the bus in one window
There is another convenient way to work on the pattern. Put Gluon on the drum bus, then add instances to individual tracks: the kick, snare, hi-hats, or percussion.
Open the instance on the bus and click Gluon Map. The table shows the available plugin instances and their settings. With the whole pattern playing, you can adjust the kick’s Threshold, the snare’s Attack, or the percussion track’s Mix directly from this view. There is no need to open each plugin window separately.
This makes it easy to move between two levels of processing: shaping individual drums and hearing how they feed the bus compressor. If one sound is driving the group too hard, you can adjust its processing while staying in the bus compressor’s window. Each instance also has a Bypass control for checking its contribution.
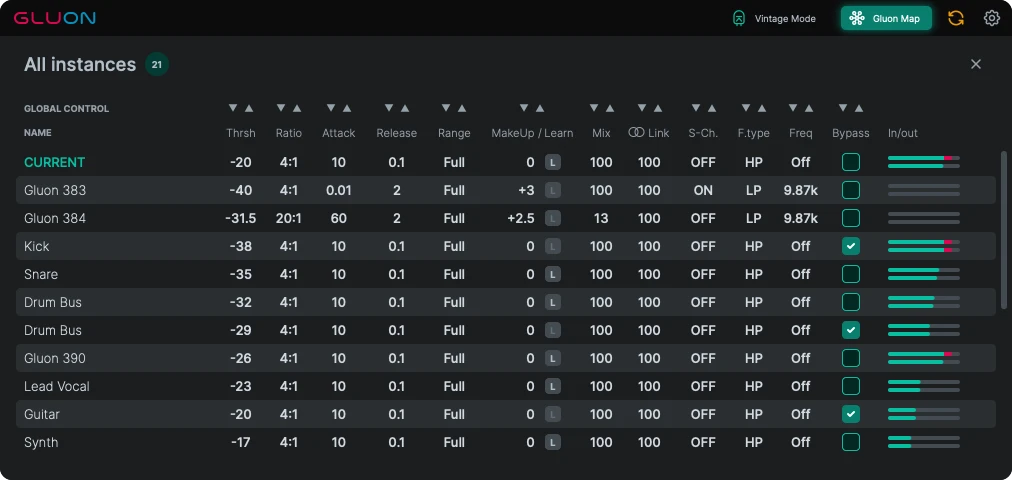
Routing the tracks into a drum group is still handled by your DAW. Map gives you shared access to Gluon’s controls, saving you from constantly switching between windows.
In the screen recording below, I open Gluon Map from the drum bus and adjust the kick’s Threshold and the snare’s Attack without opening their individual plugin windows. Watch which track’s row changes, then follow the return to the bus controls.
Gluon Map controls the available instances; the DAW handles the audio routing. This silent clip demonstrates the workflow.
When is there too much glue?
I hear too much processing when the contrast I wanted starts to disappear: the hits stop standing out, quieter details and noise become too prominent after level compensation, and the part feels dense all the time.
Vintage adds another thing to listen for: distortion. Sometimes an overloaded, dirty sound is exactly the point. Sometimes it reduces clarity and becomes tiring. The musical intention matters: the same result can work for a rough beat and be too much for an open, airy part.
An overly softened attack can feel less immediate and forceful. When I want drums that hit me in the face, I protect that initial contrast and use compression and saturation more carefully.
Keep returning to the original and listening for the qualities that made the pattern work in the first place. A compressor can bring well-chosen sounds together, but their balance, length, and relationship still matter.
Try it on a loop
Build a short loop from a kick, snare, and hi-hats, then make three versions: the original, moderate bus compression, and a blend with a heavily compressed parallel layer. Compare them at similar loudness.
Listen to the onset of each hit, the movement between them, and the quieter details. Then bring the other instruments back in. Density that impresses in solo can be too much in the full track.
Gluon includes extended controls and a Mix knob for these techniques, and it is free. Start with straightforward bus compression and a parallel layer, then explore Vintage for additional color. Gluon Map lets you adjust the individual drums from the same window as their bus compressor.
© 2026 Ilia “nClear” Tsvetkov. When republishing material from this article, credit Ilia (nClear) and include an active link to the original article.